Welcome to the website for landscape facilities products and knowledge.

Can you provide drawings or specs for the planter boxes so our contractor can prepare the site?
Of course—I’d be happy to provide you with a detailed set of planter box drawings and specifications so your contractor can confidently prepare the site. Let me walk you through what I’ve designed, keeping both functionality and aesthetics in mind.
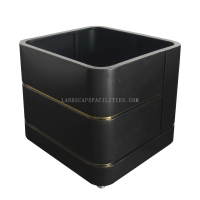
First, the overall dimensions: each planter box is 48 inches long, 24 inches wide, and 18 inches tall. This size is ideal for deep-rooted vegetables like tomatoes or flowering shrubs, while still being manageable for a contractor to build. The material I recommend is 2-inch thick cedar or pressure-treated wood, as it resists rot and weathers beautifully. For longevity, line the interior with a heavy-duty pond liner or galvanized steel sheeting—this will prevent soil moisture from damaging the wood.
Now, for the critical specs your contractor will need:
- Bottom drainage: Drill four 1-inch diameter holes every 12 inches along the base, spaced evenly. Cover each hole with a piece of landscape fabric or a plastic mesh to keep soil from washing out while allowing water to escape.
- Foundation: The site should be leveled and cleared of grass or weeds. Lay a 2-inch layer of crushed gravel or pea stone directly beneath the planter to promote drainage and prevent waterlogging.
- Assembly: Use galvanized screws (not nails) for all joints. Reinforce each corner with a 2x2 inch wooden post anchored to the inside, extending from the bottom to the top edge. This adds structural integrity, especially if you plan to move the boxes later.
- Optional but recommended: Attach a 1-inch thick strip of rubber or foam along the bottom rim to prevent direct contact with concrete or pavement, which can cause moisture buildup.
For the contractor’s preparation:
- Clear and level the site to a tolerance of ±1/4 inch.
- Dig a shallow trench (2 inches deep) around the perimeter where the planter will sit, and fill it with gravel to create a drainage trench.
- If installing multiple boxes, leave a 24-inch gap between each for easy access.
- Provide a water source nearby (a drip irrigation system can be run through the bottom drainage holes).
I’ve also drawn a simple cross-section diagram: the planter shows a gravel base, a perforated PVC pipe running horizontally 6 inches from the bottom for additional aeration (optional), and a 3-inch layer of coarse sand above the gravel for root health. The soil mix should be 60% garden soil, 30% compost, and 10% perlite for optimum drainage and nutrient retention.
If your contractor needs a CAD file or a hand-sketched plan, I can generate a scalable PDF with measurements and notes. Just let me know their preferred format. The key is to get the site flat and the drainage right—once that’s done, the planter will thrive for years. Good luck, and feel free to ask if you need any tweaks!
Related search: