Welcome to the website for landscape facilities products and knowledge.

What assembly is required for the Landscape Round Table, and what tools are needed?
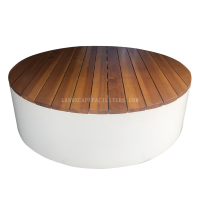
Assembling the Landscape Round Table requires careful attention to both components and proper tools. The package includes four interlocking table arc segments that form the circular top, a central support column with pre-attached leveling feet, and a concealed connection system with corrosion-resistant fasteners. Each arc segment features numbered alignment markers and interlocking joints that ensure precise fitting.
Essential tools for efficient assembly include a rubber mallet for seating the segments without surface damage, an adjustable wrench for tightening the central bolt mechanism, and a soft cloth to protect the powder-coated finish during installation. Optional but recommended items include a bubble level to verify stability on uneven ground and protective gloves for handling the weighty segments.
Begin by laying all arc segments on a flat surface with numbered edges facing upward. Connect adjacent segments using the interlocking tongue-and-groove system, gently tapping with the rubber mallet until flush. Rotate the assembled tabletop to insert the central support column, ensuring the mounting plate aligns with the underside receivers. Finalize by tightening the central bolt clockwise until resistance is felt, then perform a stability check before use.
The innovative design requires no screws for the tabletop connection, though weatherproofing sealant may be applied to the seams for permanent outdoor installation. Always conduct assembly on a protected surface to prevent scratching the durable HDPE material. Proper installation typically takes 25-35 minutes without requiring specialized skills or power tools.
Related search: