Welcome to the website for landscape facilities products and knowledge.

What are the best ways to create mobile acrylic landscape tree boxes?
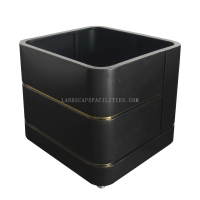
Creating mobile acrylic landscape tree boxes is a fantastic way to add versatility and modern flair to your garden or outdoor space. Here’s a step-by-step guide to help you craft your own lightweight, durable, and portable planters.
1. Choose the Right Acrylic Sheets: Opt for high-quality, UV-resistant acrylic sheets (at least 1/4 inch thick) to ensure durability and weather resistance. Clear or tinted acrylic can be used for a sleek, contemporary look.
2. Measure and Cut: Determine the desired size of your tree box and mark the acrylic sheets accordingly. Use a laser cutter or a fine-toothed saw for precise cuts. Smooth the edges with sandpaper to avoid sharpness.
3. Assemble the Box: Use acrylic cement or a strong adhesive to bond the sides, base, and edges. Clamp the pieces together until the adhesive dries completely. For added stability, consider adding small aluminum or plastic brackets at the corners.
4. Add Drainage Holes: Drill small holes in the base to prevent waterlogging. Cover the holes with mesh or a porous fabric to keep soil in place while allowing drainage.
5. Install Casters or Handles: To make the tree box mobile, attach heavy-duty casters or handles to the base. Ensure they are sturdy enough to support the weight of the soil and plant.
6. Fill and Plant: Add a layer of gravel for drainage, followed by potting soil. Plant your chosen tree or shrub, and water thoroughly.
These mobile acrylic tree boxes are perfect for patios, balconies, or indoor spaces, allowing you to rearrange your greenery with ease. With proper care, they’ll last for years while maintaining their stylish appeal.
Related search: